Sacrificing Scrap Stones
Sacrifice Scrap Stones
Intro
How do we correctly determine what stones are scrap? What do we get from sacrificing scrap stones? What are the consequences of not sacrificing the scrap?
Knowing exactly how and why we sacrifice stones will not only make our games more sophisticated, but we will also obtain more freedom and control over the flow of the game. My goal here is to give you a framework that can lighten the cognitive load for this decision making process for when you are under time pressure in a game of Go.
How to determine what to sacrifice?
1 Stones that are stuck to alive stones.
2 Stones that were played as kikashi(forcing moves).
Using these two conditions, we must determine if a stone is scrap or not. Of course there are exceptions, but on a fundamental level, this is what we use to judge if a stone is scrap or not.
1) Stones that are stuck to alive stones.
Example 1:
White to Play
 Black ataris. As white, how should you respond?
 Connecting here would be a mistake. Not just because we end up with an umbrella shape (see worst 15 shapes), but moreso because there are no follow ups (see ch.5). Since the atari'd stone was stuck to black's already alive group, saving it will have no effect on the black group.
 Playing away is better. For example, an extension off of the wall and enclosure has much higher value.
Example 2:
Black to Play
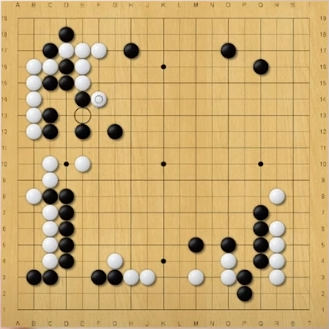
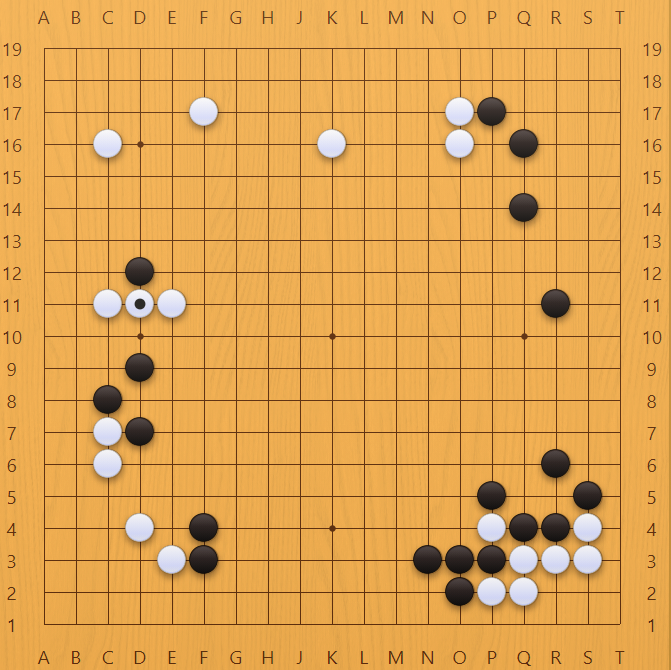
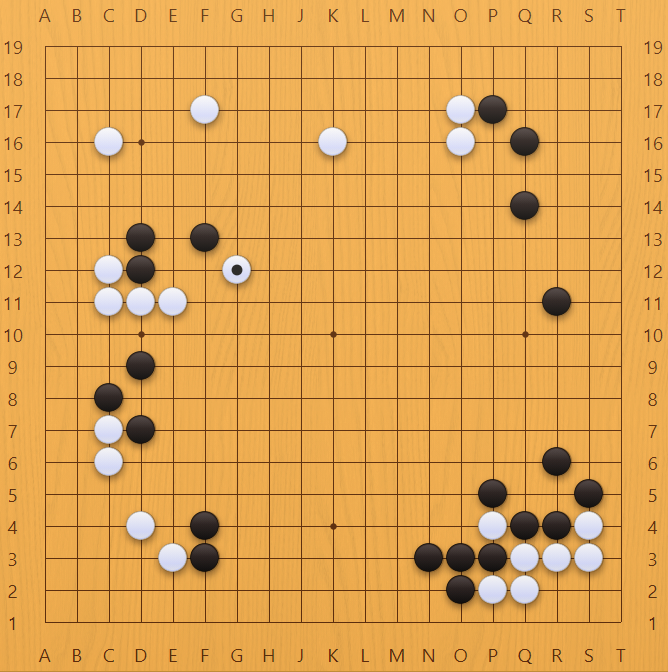
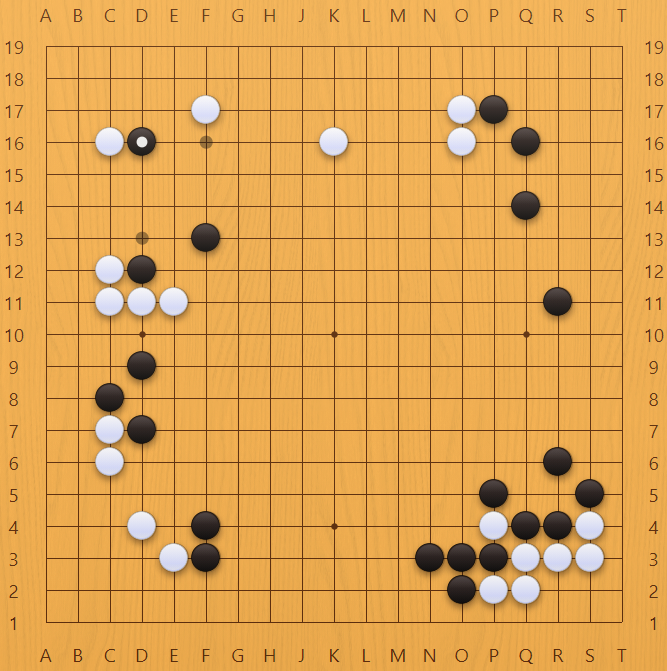
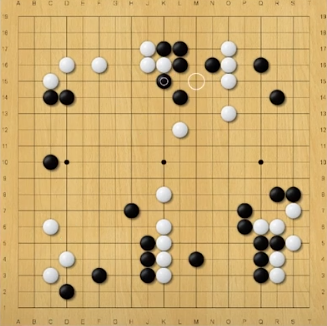
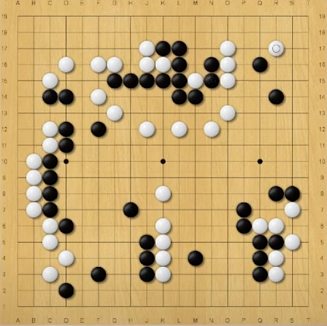
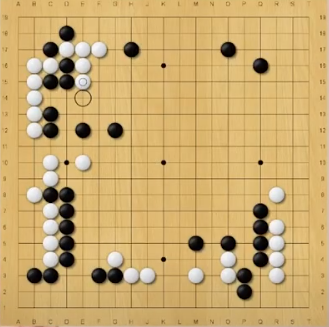 Take a look at this game state. In the top left quadrant, we can see that the two black stones in the corner are dead, making the D16 cutting stone irrelevant. Given this analysis, we know that all of white's stones are completely alive. So this means that all of the stones that are attached to the alive white group are scrap! More specifically, the three stones that white just played against are scrap.
Although those stones are scrap, white is making the mistake of trying to capture the scrap. In this moment, black can play well and not make the mistake white made.
Take a look at this game state. In the top left quadrant, we can see that the two black stones in the corner are dead, making the D16 cutting stone irrelevant. Given this analysis, we know that all of white's stones are completely alive. So this means that all of the stones that are attached to the alive white group are scrap! More specifically, the three stones that white just played against are scrap.
Although those stones are scrap, white is making the mistake of trying to capture the scrap. In this moment, black can play well and not make the mistake white made.
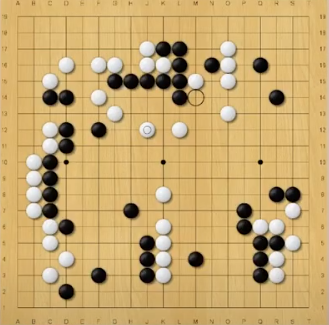
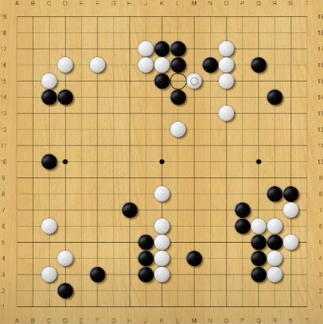
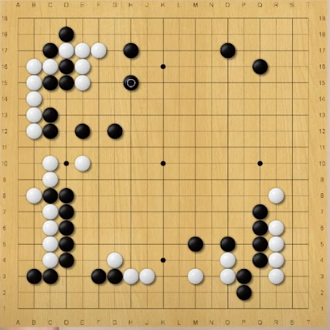 Since we will not be saving scrap stones, we can play this one space jump to quickly develop the upper right and also roughly connect up with G12.
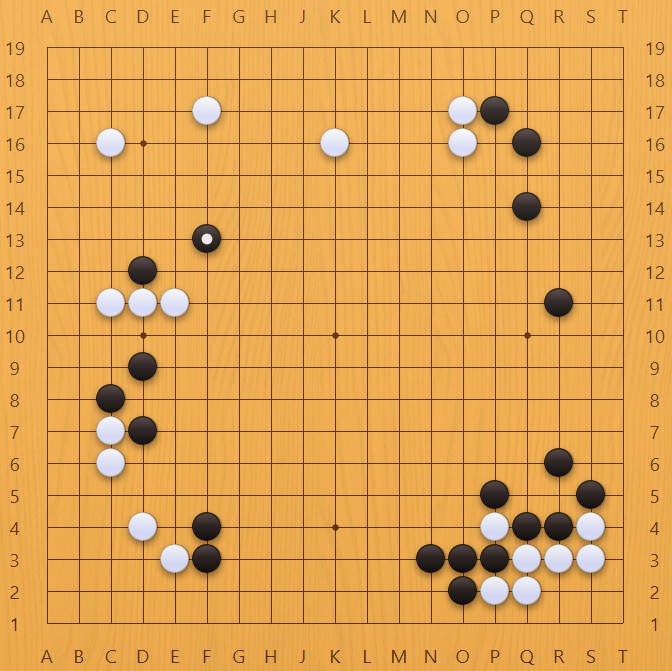
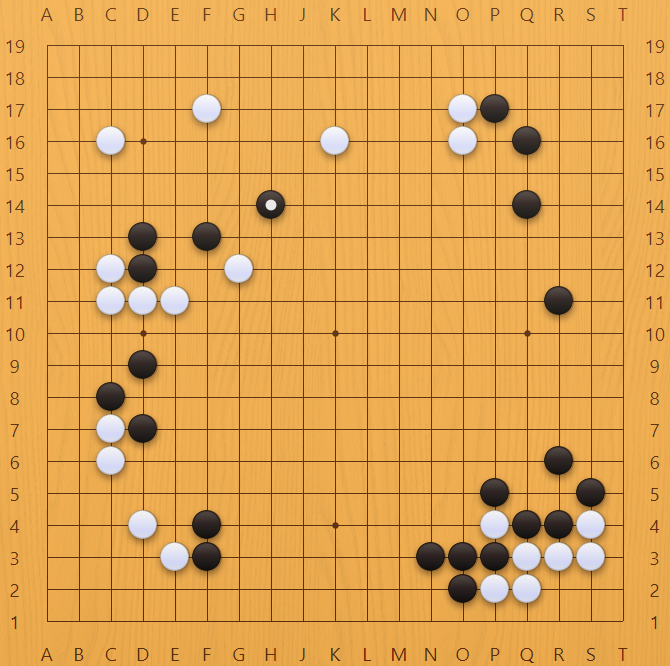
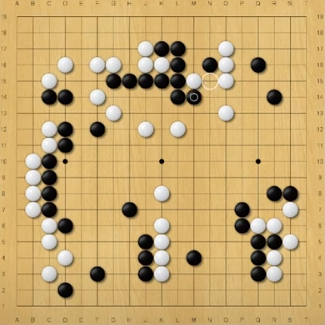
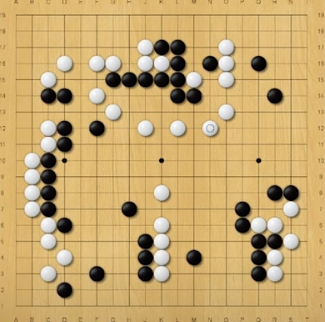
 If for example white continues to threaten the scrap stones, just to be consistent with his initial plan, black can say thank you for going after scrap stones, and then play away to develop the biggest area of the board.
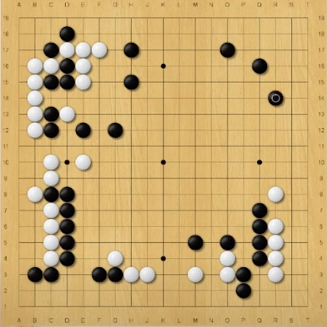 like so. And if white plays C14 to capture the three stones now, it would be a slow, low value, and low impact move.
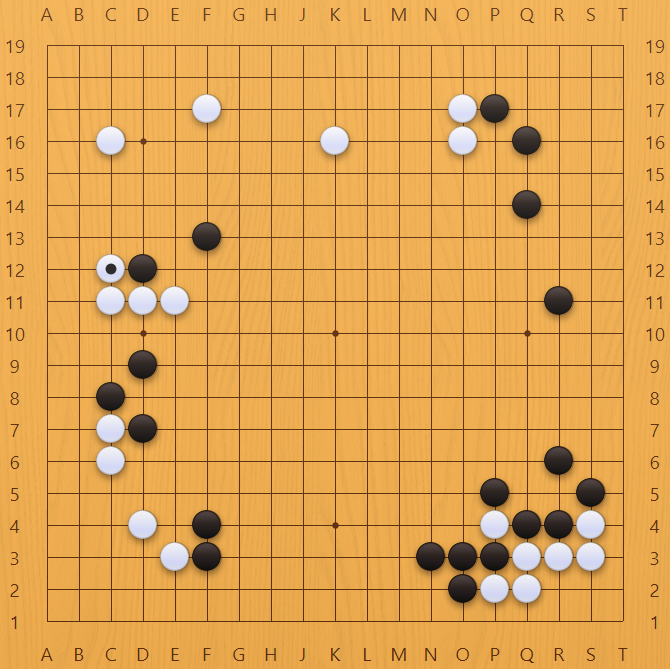
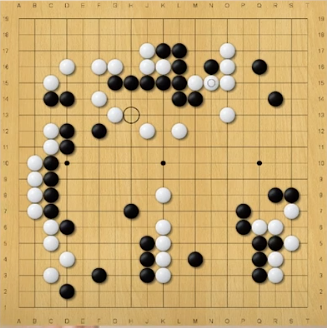
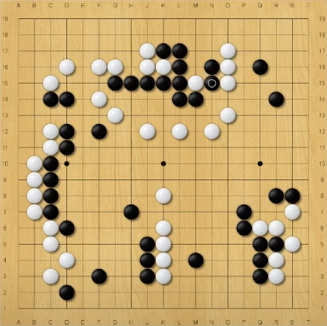
 On the other hand, let's see what will happen if black does save the scrap stones. Black hane,
 white hane,
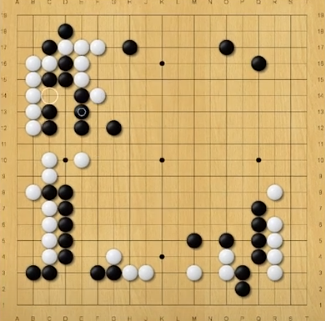 black connect.
black has saved the three stones that are attached to white's alive group, but there is nothing that black can hope to achieve by doing so. Saving the three stones won't give him anything to aim at in the corner, because those two black stones are dead. So there is no utility in saving this null cutting stone.
black connect.
black has saved the three stones that are attached to white's alive group, but there is nothing that black can hope to achieve by doing so. Saving the three stones won't give him anything to aim at in the corner, because those two black stones are dead. So there is no utility in saving this null cutting stone.
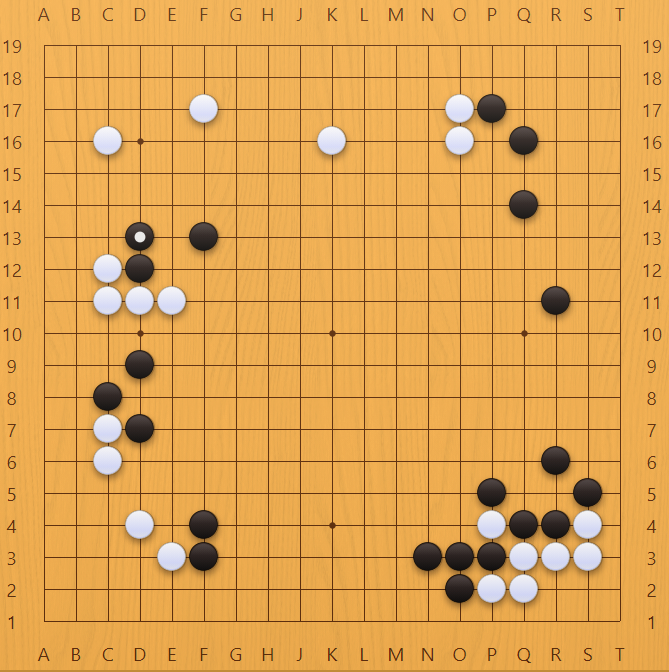
 Not only that, but white can play this kind of continuation to separate the entire group from the right side. Black has just increased his burden for nothing in return.
now behold the difference this makes.
This is why we sacrifice Stones stuck to alive groups.
2) Stones that were played as kikashi(forcing moves).
Example 1:
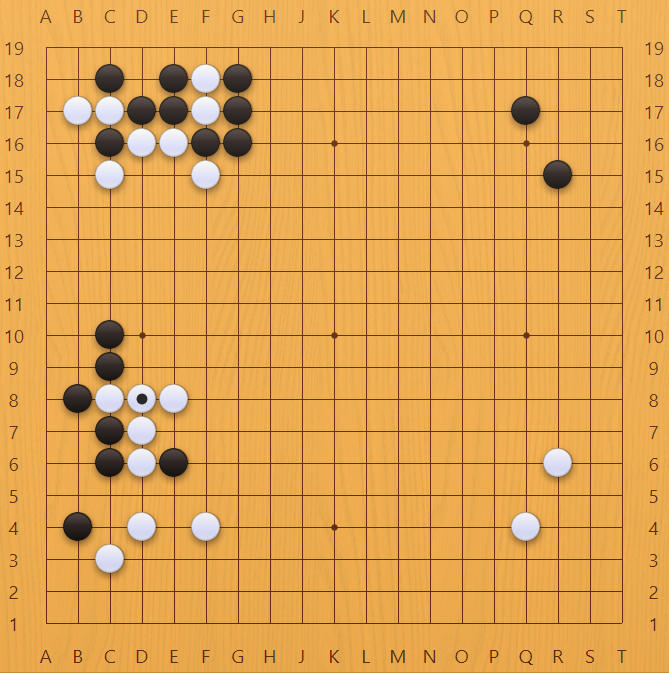
 Black peeps to threaten splitting the one space jump.
 White connects.
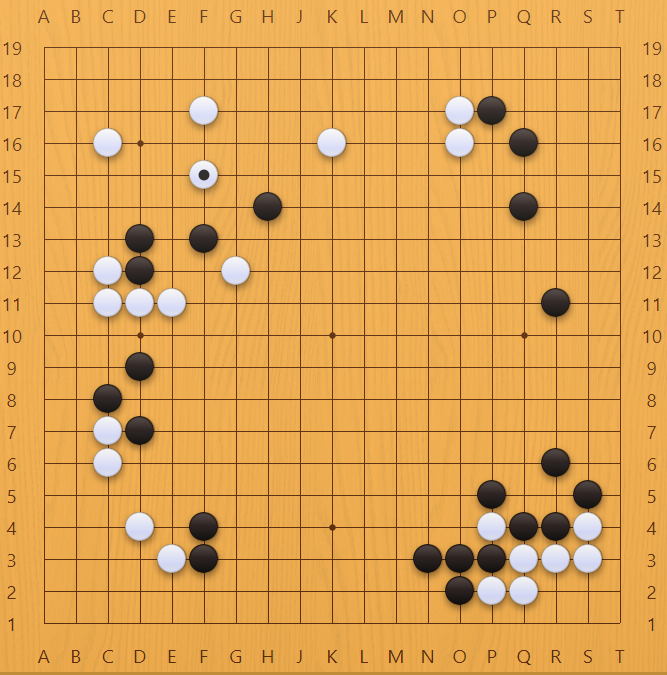
 Black lightly flys towards the center.
 White turns. Now black to play, what's the next move?
 If you extend to save the peeping stone because it's now weak due to bad shape (see worst 15 shapes article),
 White will knight's move to attack the whole thing.
 Black now has to run out a heavy group.
 And meanwhile, white will consolidate the corner territory in sente.
 Instead of saving the kikashi stone, we should treat it lightly and play away. One option is to attach and aim to sabaki.
 AI seems to prefer this one. Either way, by sacrificing the forcing move, black avoided making the light stone heavy.
Example 2:
 Take a look at this game state. In this moment, black has an unstable group that is mostly surrounded, and the main topic is how he will settle this group.
White to Play
 So, black turns and threatens to capture one stone to try and make his two eyes for life.
White's next move is the theme for this example.
 Here, white saves this one stone and here, we must determine if this stone was scrap or not.
 To figure this out, it would be unfair to not see how the moves in this area played out so let's back track and see.
Black had just played this tiger's mouth.
 white peeps
 black connects.
I think some of you get it now.
black connects.
I think some of you get it now.
If we go back to the original board position, we can now see that this white stone that black has turned around was a stone that was played as a kikashi, or forcing move. (The peep forcing the connection.)
Which means, that this stone falls under 'stones played as kikashi'.
And since we can't be saving scrap stones, white has to be overjoyed to sacrifice this stone.
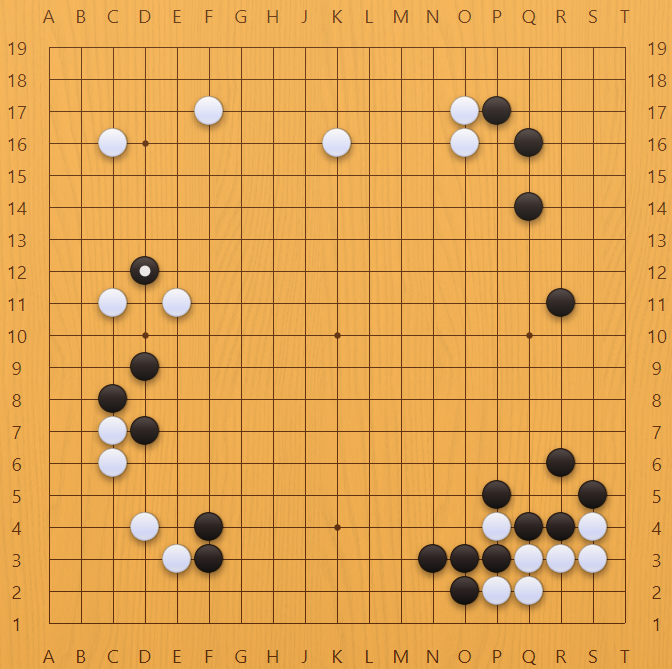
 The correct move here is to play the kosumi and completely seal black in, forcing black to take the scrap stone.
 When black does take the one scrap stone,
White can just appreciate the fact that black just played a painfully small move.
When black does take the one scrap stone,
White can just appreciate the fact that black just played a painfully small move.
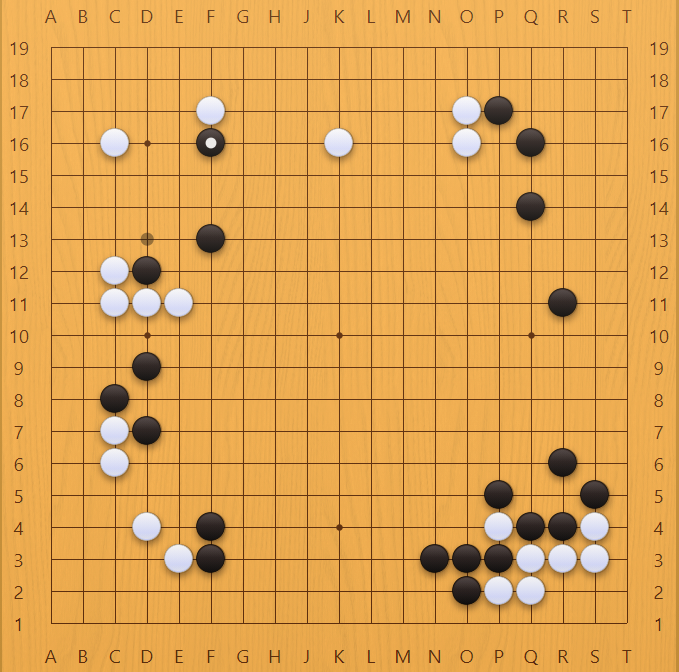
 After relishing in the fact that your opponent was forced to play a painfully small move, you can go ahead and play the biggest area on the board, completely outpacing the opponent.
From black's perspective, he has just captured one scrap stone for a grand total of 2 points, while white has completed the surround in sente, made the weak stick on the bottom side of the board strong via the relationship between it and the surrounding stones, and invaded the corner.
After relishing in the fact that your opponent was forced to play a painfully small move, you can go ahead and play the biggest area on the board, completely outpacing the opponent.
From black's perspective, he has just captured one scrap stone for a grand total of 2 points, while white has completed the surround in sente, made the weak stick on the bottom side of the board strong via the relationship between it and the surrounding stones, and invaded the corner.
But let's see what it looks like if white saves the scrap stone.
<ImageText src="/assets/blog/theory5/part2/theory5-18.PNG" text1="Black attaches to escape the surround, and all of a sudden white's group on the right is disconnected and isolated within black's moyo.
" text2=""/>
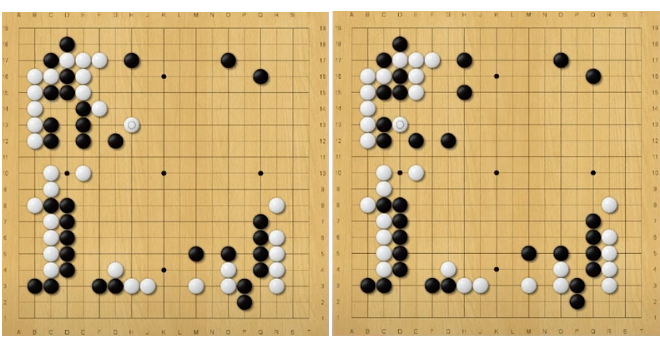
Finally, let's see the two results side by side.
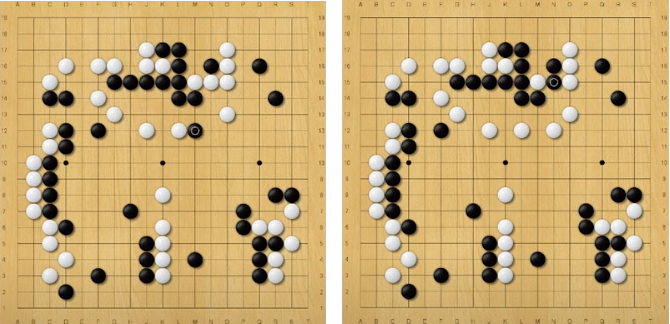
The difference is night and day.
Recap:
1) Stones that are stuck to alive stones are scrap.
On the left, we failed to identify the scrap stones, so we missed the chance to play the moves we really want. And since we now owe moves to commit to saving the entire thing, we probably won't ever get to play the moves we really wanted.
On the right, we correctly identified the scrap stones and got to play the move we really want. And we don't owe anything so we have the freedom to continue playing what we want.
2) Stones that were played as kikashi are scrap.
On the left, we got baited into saving a scrap stone and missed our opportunity to surround in sente. Because we didn't get the surround and connect, we will now be very busy managing all of our weak groups.
On the right, we allowed the capture of the scrap stone and successfully surrounded in sente. This gives us the freedom to play what we want.
Conclusion
Now that we have these two conditions for identifying stones that are no longer valuable, we can now sacrifice with more certainty. Correct application of sacrifice isn't just some fancy strategy that conceptually makes your game more sophisticated. It actually gives you more freedom to play the moves you really want.
I hope that this will help you make the judgement on sacrifice more decisively. I hope that it helps you avoid frustrating situations where you are running with a group that you have no use for, and that the added opportunities to tenuki and take sente give you more freedom and control over your games.
After I learned this way of thinking, in those moments where I had to make the tough decision to sacrifice or not, I was able to rely on these concrete definitions to inform my decision making where before, there was no consistency in the decision making.
-Hiro Nakae

